


Giving Apache Web Server A Different Name by changing Source Code Before Installation (very simple instructions)
I am going to show you how to change Apache's source code before compiling and installing so that it always shows a different name while using the technique described here. I have used Apache version 2.0.59 for this tutorial. Assuming that you have already downloaded the source code and extracted all the files in httpd-2.0.59, 'cd' into httpd-2.0.59 and use 'nano' (or your favourite text editor) to open the file (httpd-2.0.59/server/core.c) containing the Apache label.
cd httpd-2.0.59
nano ./server/core.c
Now, search for the string "ap_set_version(apr_pool_t *pconf)" (w/o quotes). If you are using nano press Ctrl-W to use the "search" option. On my computer the code (circled in red below) was present on line 2492, so it should be about the same on your computer as well. |
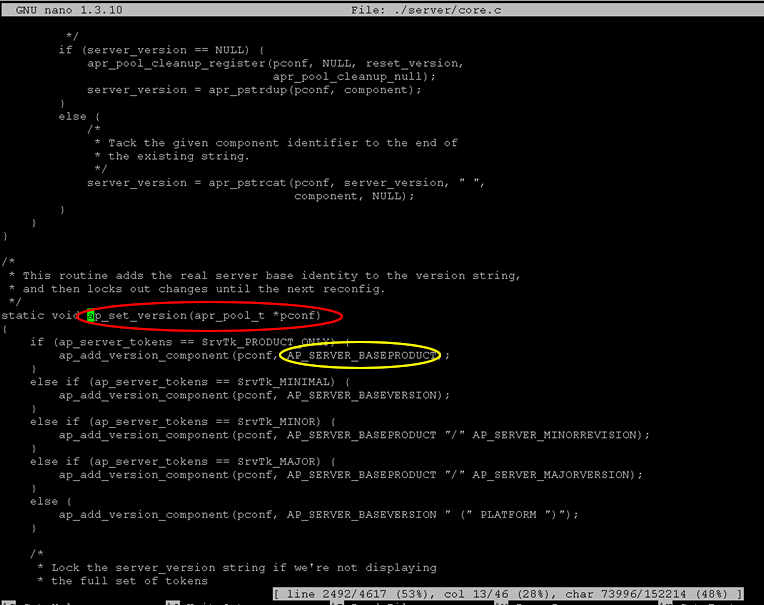
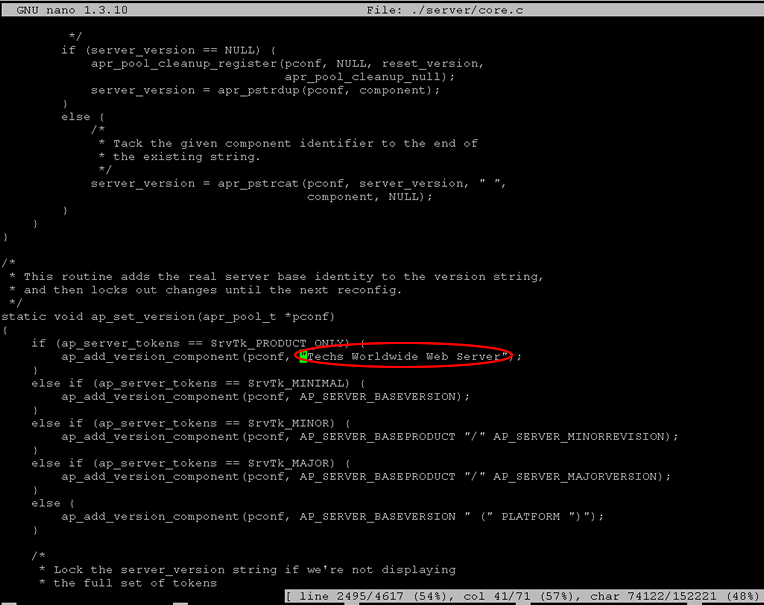
| Now, you have to put your string in place of the constant AP_SERVER_BASEPRODUCT (circled in yellow above). Please note that you'll have to put your string in double quotes e.g. "Techs Worldwide Web Server". Code in the file will look like below (string is circled in red) after making the changes explained. Please make sure that you put double quotes (") at both ends of your string. |
|
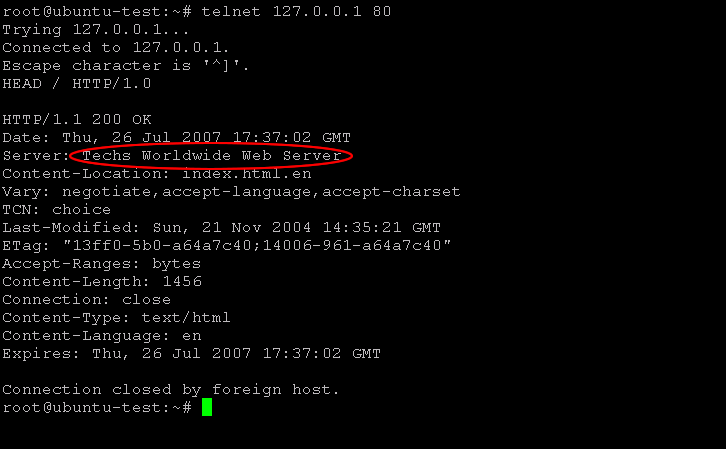
That's it. Save the file (Ctrl-O for nano) and exit out of the application (Ctrl-X for nano). Now, compile and install Apache using this modified code. Once your are done installing Apache, go to Apache's configuration file (http.conf by default) and change the value for "ServerTokens" directive to "ProductOnly" (w/o quotes). ServerTokens ProductOnly Restart Apache and use the technique described here to see the name of the server. The web server should be reporting "Techs Worldwide Web Server" as its name. |
Did this tutorial help a little? How about buy me a cup of coffee?

Please feel free to use the comments form below if you have any questions or need more explanation on anything. I do not guarantee a response.
IMPORTANT: You must thoroughy test any instructions on a production-like test environment first before trying anything on production systems. And, make sure it is tested for security, privacy, and safety. See our terms here.
 tags cloud
 popular searches
free download for mysql database server 5.1.5, bison, gearman, source code, php, install cairo, java, laptop, install mysql, linux, mysql, mysql mysql, mysql initialization, tools, ubuntu
Similar Tutorials:
- How to download, compile, and install Python on Ubuntu/Debian/ CentOS Linux
- Starting Apache Web Server at every Reboot (for Ubuntu / Debian Linux)
- Starting with Git - Setting up remote environment for Git
- How to setup Spamassasin to run as a deamon?
- Install MySQL Server 5.0 and 5.1 from source code

Comments (write a comment):
Thanks a lot.
This worked for me. Little change in Httpd 2.4.9 what I was looking for.
Now I want to replace the "mod_wsgi/3.4 Python/2.7.6" which gets added to the server name Posted by: Avi on Nov 04, 2014